

If you’ve found yourself with an indoor plant that loves vertical growth, it’s time to make your first DIY moss pole!
With our step-by-step tutorial, you’ll learn to make your own moss pole in just four steps. It’s a super easy process and should take you around 10 minutes to complete once you have the materials.
There are a few tricky parts, but don’t worry. I’ve found solutions to all of them, and have really refined the process to make this as easy as possible.
If you’d rather just buy a sphagnum moss pole or learn about why people use them, don’t worry; we’ll go over that.
(I’ll also cover the plants that thrive on a moss pole, and the types of moss you can use!)
Table of Contents
Why use a moss pole for plants?
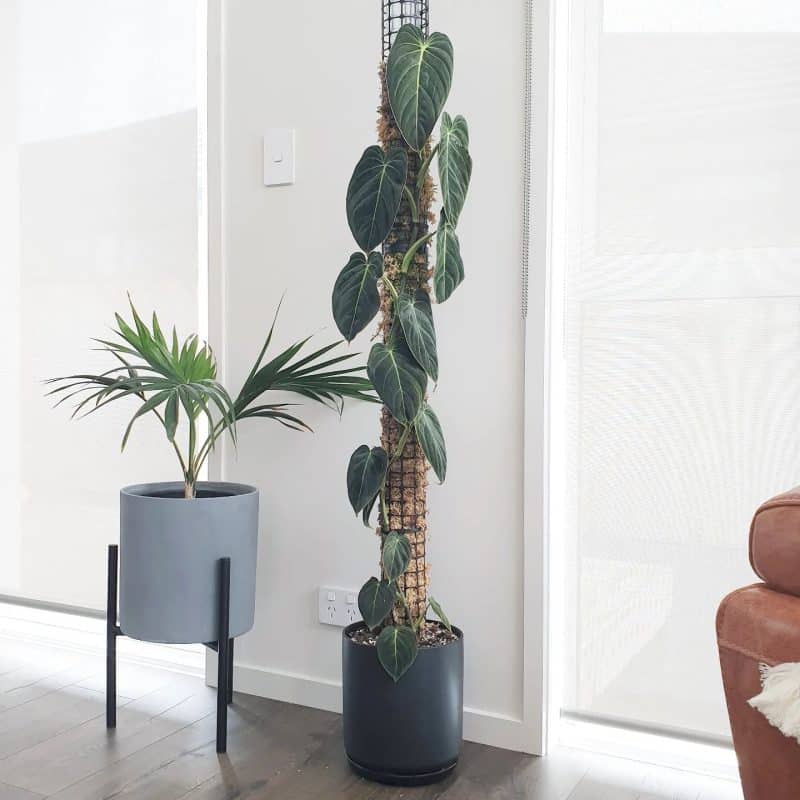
If you have a climbing or vining indoor plant, moss poles are a fantastic way to support their growth and encourage them to produce more, larger foliage.
Moss poles aren’t just limited to being constructed out of moss (as the name might suggest). One alternative is coco coir, a fiber made from coconut. Coco coir is a great choice as it’s an eco-friendly, natural material that biodegrades easily.
Really, any substrate that will allow your climbing plant to take advantage of its aerial roots can be lumped into the category of moss pole.
The most common material you’ll find is sphagnum moss, which works great with one caveat. When handling sphagnum moss you do need to wear gloves, so alternatives are becoming more popular.
(If you want to see what the finished product should look like, or if you decide it’s just easier to buy your own, here’s one of our favorite pre-made moss poles.)
Reasons for using a moss pole:
- They simulate the natural environment of indoor plants. Climbing plants like epiphytes naturally grow on other plants or trees and often get nutrients through dust and the air. By providing them with a moss pole, you’re recreating their natural environment and giving them the greatest chance to thrive.
- Moss poles make your plants look fuller and lusher. If you’re using a moss pole with a climbing plant, you’ll notice that as the plant reaches up the leaves become larger and often more vibrant with more fenestration. But even just the support of the pole can encourage your houseplants to provide more foliage. When you allow leaves to trail down instead of climbing up, they typically get smaller.
- Moss poles prevent plants from becoming pot-bound. Typically when you see your plant’s roots beginning to circle the edge of a pot, it’s time for a repot. A moss pole however encourages aerial root growth, which means the plant can continue to grow vertically without being restricted. If you have a slow-growing plant, this can really extend the amount of time between repotting.
- Aesthetics. Let’s be honest, sometimes you just want your room to look good. Adding a moss pole is a great way to break up the design of a room, adding dynamic height and color.
- Take advantage of the vertical space in your room. When you let your plants climb you increase your plant density by taking advantage of the vertical space/light. This can increase the local humidity (through clustering plants), air filtering, and the number of plants in the same space.
- They’re inexpensive and fun to make. The materials are pretty affordable if you’re going the DIY route. If you want to buy a premade sphagnum moss pole, you can usually buy a pack of 6 for under twenty dollars.
- They set your plants up for success from the beginning. By starting with a moss pole you don’t have to worry about disrupting a complex root structure later on or trying to manage unruly aerial roots. If your plant tends to sprawl, a moss pole will help it grow more upright.
What kind of plants need a moss pole?

Moss poles are commonly used for plants in the Araceae family, as they are notorious for being fast growers that love to climb. When aroids are in a humid environment they’ll climb on just about anything, so the growth medium (moss vs coco coir) matters more if your humidity is a bit limited.
Tip: If your plants have aerial roots, that’s a great indicator that they’ll do really well on a moss pole.
Some of the most popular climbers that benefit from a moss pole include:
- Monstera (Monstera delicios)
- Pothos (Epipremnum aureum)
- Philodendron
Okay, let’s get started with our tutorial on how to make your own moss pole.
(This tutorial also works if you’re using a pre-purchased moss pole and just want to learn how to use it!)
DIY Moss Pole tutorial
We’ll need a few materials to get started on this project:
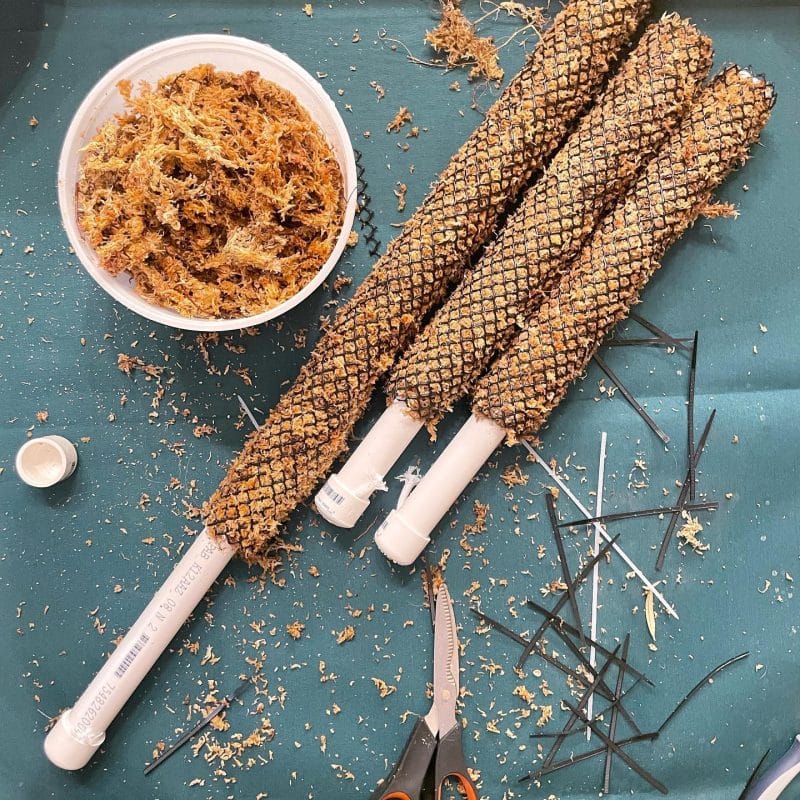
- A pole, I recommend a PVC pipe (a wooden dowel or bamboo can work great too)
- Wire mesh (String, fishing wire, or twine works too)
- A growth medium: sphagnum moss, sheet moss, or coco coir (coconut fiber) (our favorite source is here).
- Rubber gloves (if using sphagnum moss)
- Scissors/wirecutter
- Cable ties
You’ll notice in this tutorial we’re wrapping the pole with string, capping one end, and then placing the string inside the PVC pipe. This is how we can make a self-watering moss pole. Instead of spraying the moss pole with water, just water it from the top and the moisture will wick out through the string, providing moisture to the pole.
I recommend using PVC-coated wire mesh, too, so that you don’t have to worry about corrosion or too much moisture.
Okay, let’s get started!
Step 1 – Soak your moss (optional)
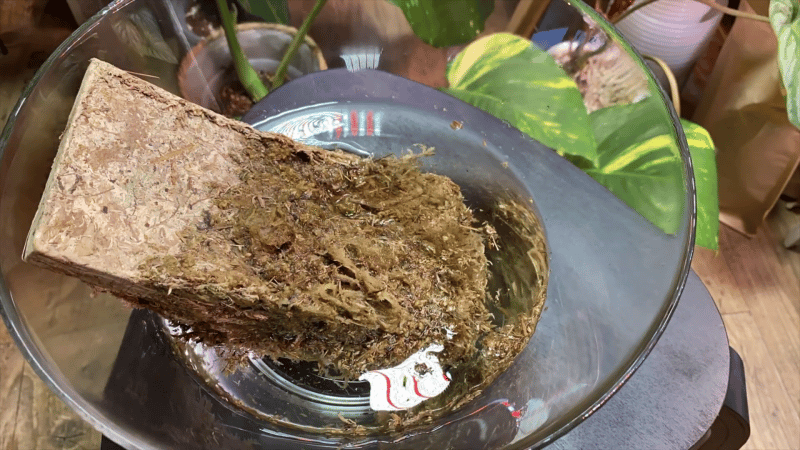
If using sphagnum moss you’ll want to soak it for at least 30 minutes before using it. This rehydrates the moss and makes it more flexible for wrapping. If using sheet moss or coco coir, there’s no need to soak.
With sphagnum moss, make sure to squeeze any excess water out as you remove it from the water. Also: wear gloves!
Step 2 – Attach your moss to the pole

We’re using a PVC pipe for this tutorial which can either be wrapped with string (to make it self-watering) or left as is.
You’ll want to source PVC wire mesh (or chickenwire) that’s the same height of your PVC pipe to cut down on… cuts.
Gently bend the mesh into a U shape so that you can start filling it with your moss. Place your PVC pipe in the center, tuck the mesh under it, and then roll it so that the mesh overlaps.
As you hold it firmly in place (the mesh should keep its form), you can start to attach it together tightly using the cable tie-offs (we’re using black). Add them every few inches, zip them closed, and then snip any excess wire.
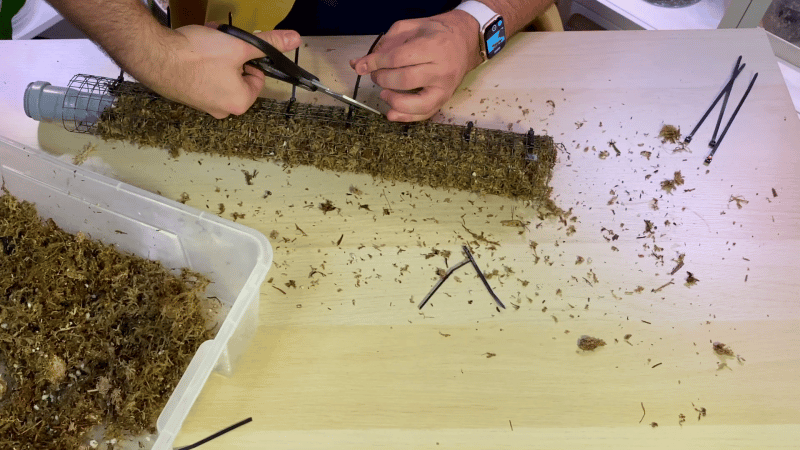
Now you can pack extra sphagnum moss into any low spots and poke it into place with a pen (or whatever you have handy).
Step 3 – Establish your pole and attach your plant
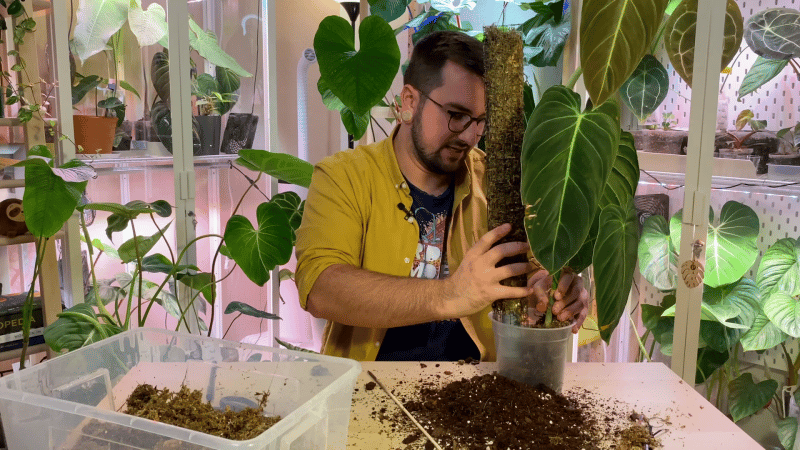
Now that you have your main support covered in moss, it’s time to secure your poles and attach your climbing plants.
Place your pole in a pot, and fill the pot with potting soil. Gently press the pole into the soil until it’s secure. If using coco coir, you can mist it lightly with water to help it compact around the pole.
Now let’s add the plant. Climbing plants like ivy, pothos, or philodendron will be happy growing up your moss pole. Gently remove the plant from its current pot, and carefully tuck the roots around the moss-covered pole. Add more potting soil to the pot as needed, and water lightly.
If you’d like, you can train your plant to grow in a certain direction by attaching string or fishing line to the Moss Pole and guiding the plant where you’d like it to go.
Step 4 – Encourage aerial root attachment
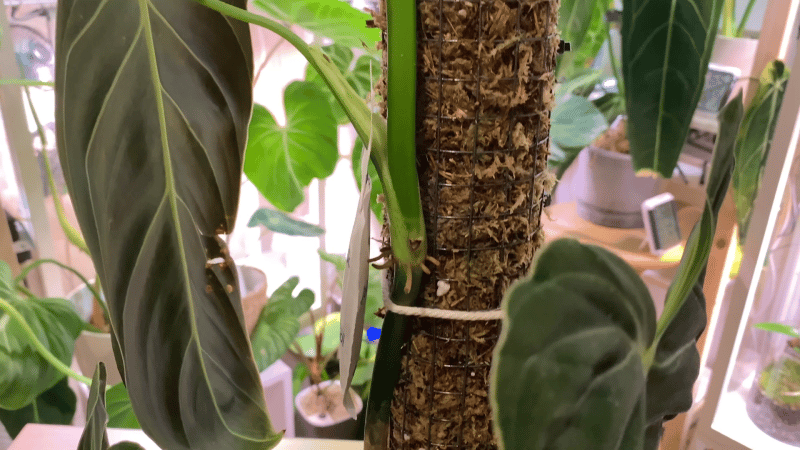
Keep an eye on your plant over the next few weeks as it grows up around your new moss pole and keep spraying it with water to encourage roots to attach.
The humid environment and contact with the moss medium will signal the plant to continue producing roots and to anchor to the moss pole.
Things to Avoid
If your aerial roots aren’t making contact with the moss pole’s substrate and rooting, you can gently encourage them to anchor in.
Two factors lead to aerial roots taking root in a moss pole: surface contact and moisture, so consider misting those surface interfaces several times a day until the root works its way in and you’ll have less unruly aerial root structures. You can also mist the pole itself with diluted rooting hormone which will encourage root growth as the plant’s roots make contact with the surface.
Additional tips:
- Keep your moss out of direct sunlight, as this will dry it out and prevent roots from attaching.
- Don’t overwater the moss pole as this can introduce rot.
Moss pole alternatives
If you’re not looking for a fun DIY project or to pull out your wire cutters and PVC pipes, don’t worry there are a few alternatives that we recommend for climbing houseplants.
- Trellis. Not all tropical plants produce air roots, and if you aren’t looking to connect those roots back into peat moss, you might not benefit from using a moss pole.
- Stackable moss poles. You can buy these premade as a cheap way of assembling multiple moss poles into either one tall stack or keep them separate for each climbing plant.
- Branches from a tree. If you have a friendly tree that’s happy to donate some branches, you can take these and cook them in your oven at low heat (230F) for an hour to kill off any bugs that might still be inside.
- Cedar plank. The problem with using a common wooden stake is that as your vining plants grow, so does rot on the wood. Cedar is the exception: it’s both mold and rot-resistant and has natural properties in its sap that inhibit most common houseplant pests. Just wrap with jute twine for an easy, clean look.
What these alternatives lack is the ability that sphagnum moss has to hold moisture. When you wrap sphagnum you’re creating a nucleation point for vines to attach to, providing moisture to the root system as a clue that this might be a good place to park.
Conclusion
A moss pole is a great way to give your plants the support they need to grow tall [and strong]. With just a few materials and 10 minutes of time, you can make a moss pole that will last for years and help your plant reach its full potential. Best of all, it’s super easy to do and can build a lot of confidence as you start to take on more DIY projects.
If you found this tutorial helpful, feel free to share it with a friend, or make a few of your own moss poles and distribute them! Like always, if you have any comments or questions please do get in touch on social media through Instagram or Twitter.
Plant carefully!
FAQ
Does my monstera need a moss pole?
Nope, a moss pole is totally optional! It can help your plant grow vertically, but you could also use fishing line or string to help guide your plant in your direction of choice.
What does a moss pole do?
A moss pole provides a structure for plants to grow vertically, helping them to reach new heights and thrive. It’s also a great way to train your plants to grow in a certain direction. A moss pole also helps tidy up your root structure and adds a bit of decoration to a room.
Do moss poles help plants grow?
They do! A moss pole can help your plant grow by providing vertical reach, letting them grow larger leaves and take in more light.
How long does it take for a plant to attach to a moss pole?
It takes a plant anywhere from a few days to a week to attach to a moss pole. During this period you’ll want to keep the moss pole moist and encourage the root towards the surface. You can also mist the aerial roots with water or rooting hormone to help them take root.
What can I use instead of a moss pole for monstera?
Try using cedar, bamboo, or a trellis to support the weight of your plant. Really any sturdy object works as long as it won’t rot and you’re sure you’re not introducing bugs from outside.
What kind of moss do I use for a moss pole?
Sphagnum moss is our preference, but remember to use gloves when handling. Alternatives to moss include coco coir (coconut fiber) or even just wrapping a thick twine around your pole.
Do moss poles provide nutrients?
No, moss poles do not provide nutrients to plants. They simply provide a structure for plants to grow vertically and attach to. For air plants, they do provide more vertical surface area for the plant to grow, and since these plants grab nutrients out of the air and dust they do provide more opportunities for nutrients.
How should I handle sphagnum moss on an existing moss pole?
Sphagnum moss is a bit fragile but in our experience, it doesn’t damage too easily. Once you attach it to the pole, keep the moss moist, as dry conditions can cause it to shrink and fall off.