
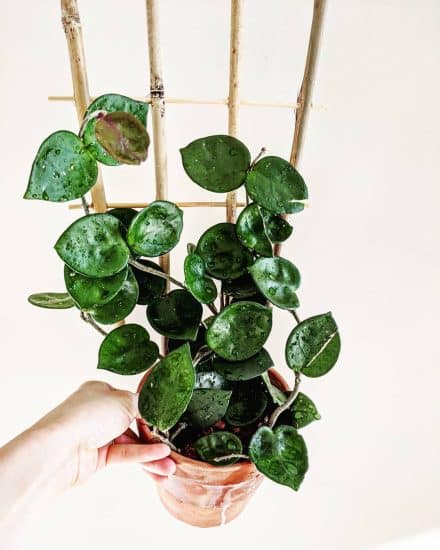
You enter a room and there it is: that eye-catching, envy-inducing Hoya Chelsea elegantly cascading from its perch, just begging for your admiration. This beauty is the perfect addition to your indoor gardens.
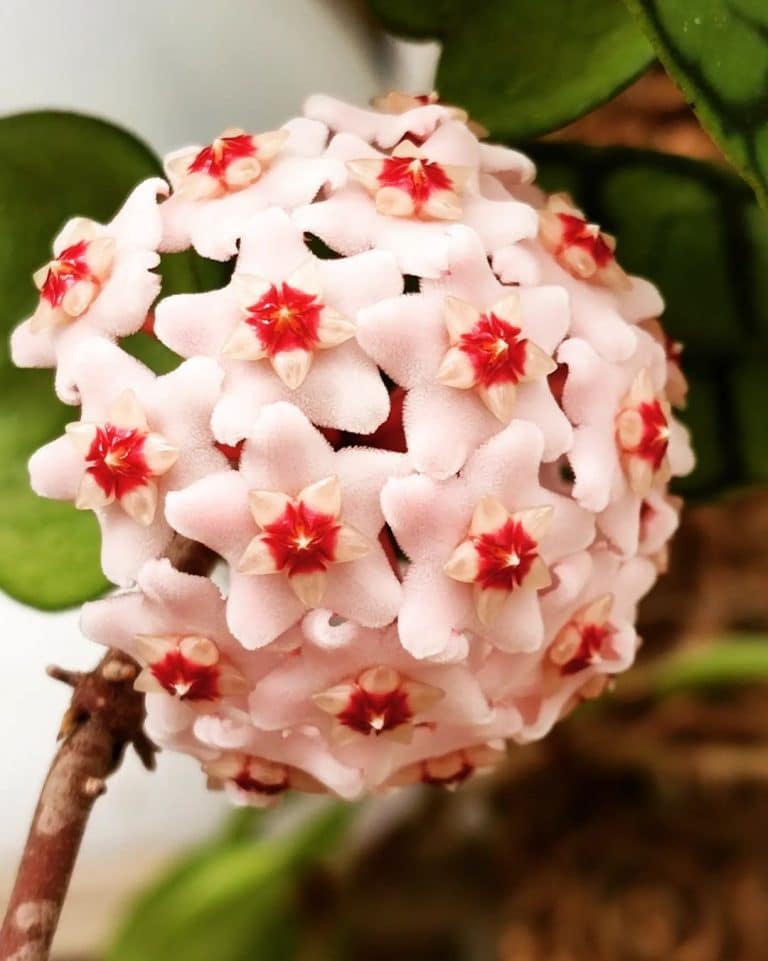
Thick, waxy leaves and delicate clusters of tiny, star-shaped flowers — what’s not to love? Not only is it beautiful, but it’s also incredibly low-maintenanc,; like the best of both worlds growing in the same pot!
We’ll explore the wonderful world of Hoya Chelsea care, teaching you everything you need to confidently grow this hoya indoors. Don’t be surprised if it becomes a bright green star in your collection and even inspires some friendly plant envy.
Table of Contents
Hoya Chelsea Plant Care Guide
History, Habitat, and Characteristics
Hoya Chelsea (Hoya carnosa ‘Chelsea’), native to the lush regions of Southeast Asia, boasts charming foliage and fragrant flowers with a sweet scent.
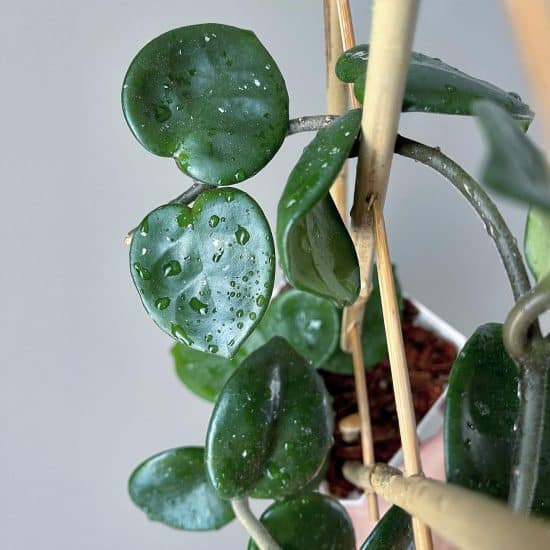
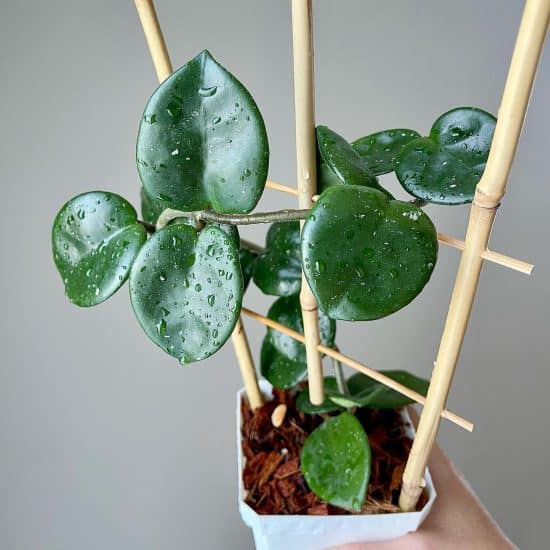
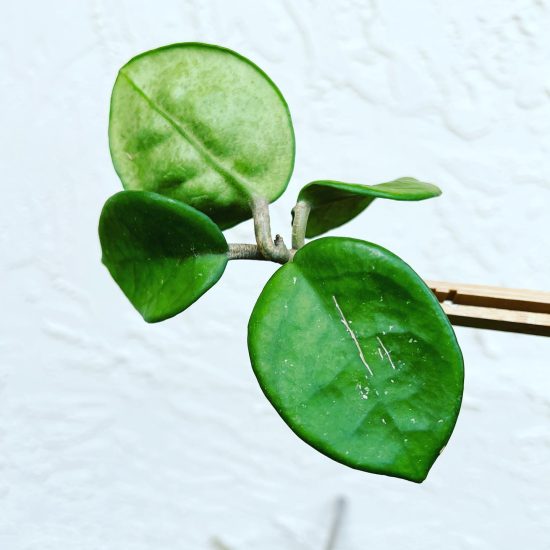
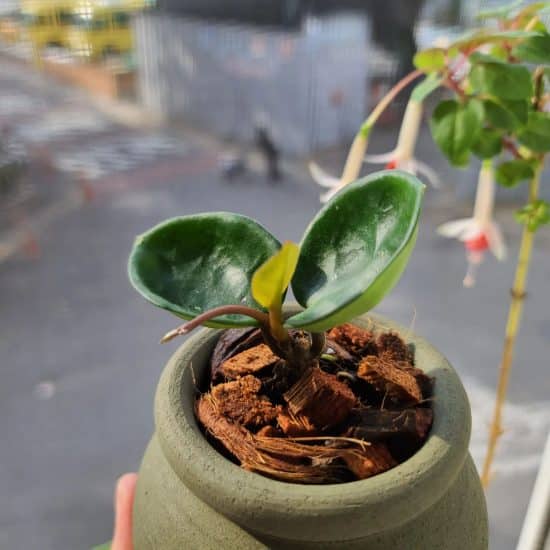
Hoya Chelsea is a natural hybrid between the classic Hoya carnosa and the intriguing Hoya carnosa ‘Krinkle 8’. This fruitful combination resulted in a plant featuring rounded, heart-shaped leaves adorned with green veins and winsome cup-like divots.
The thick, succulent-like texture of Hoya Chelsea leaves has an added twist: charming ridges that tend to capture extra attention. And if the foliage isn’t enough to win you over, the plant’s fragrant, five-pointed wax star flowers will certainly seal the deal!
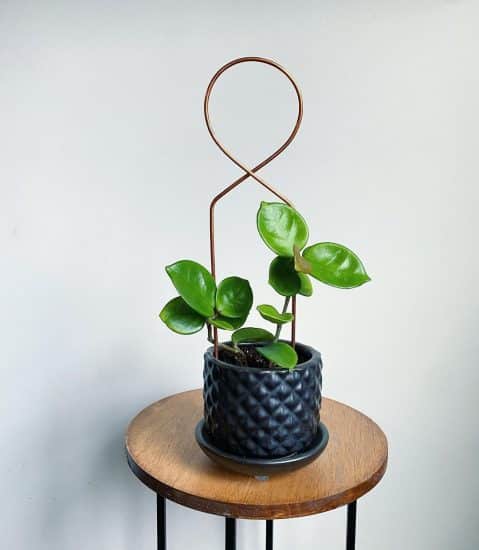
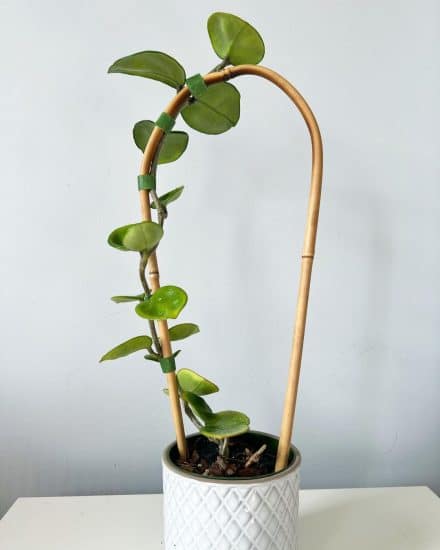
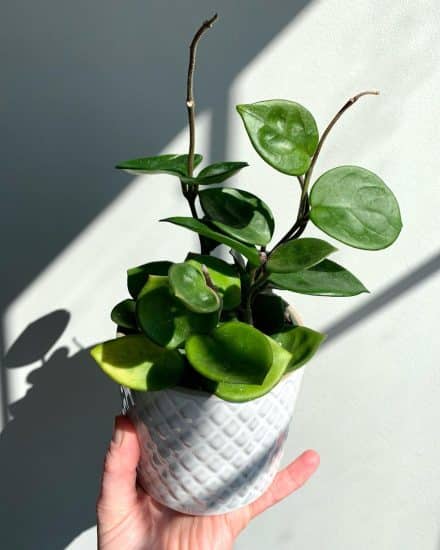
Hoya Chelsea is a trailing plant, making it a great choice for decorating indoor spaces. You can watch it flourish on a trellis or let it elegantly cascade from a hanging pot. So, what makes it so special and versatile?
What’s the root of Hoya Chelsea’s distinctiveness?
Hoya Chelsea is an epiphytic plant, meaning that in its natural habitat, it grows along trees, deriving some of its nutrients from the air and rainwater. These same characteristics allow it to thrive mounted on a wall, hanging in a basket, or sitting in a cute decorative pot.
Fun fact: Have you ever wondered where the parent plant, Hoya Krinkle 8, got its name? It has eight distinctive ridges on each leaf, which contribute to Hoya Chelsea’s appealing leaf texture.
Light
Hoya carnosa ‘Chelsea’, hailing from tropical and subtropical climates, enjoys dappled light or bright, shaded areas, as this promotes compact growth with shorter internode distances. It’s not too fussy, though — it can still survive in lower light conditions, albeit with less vigor. If you notice your hoya plant is growing slowly or looking leggy, it’s asking for more light.
The main concern is direct sunlight. Too much morning sun or afternoon sun can cause the plant’s green leaves to burn or scorch and also increases the risk of pests. To ensure your Hoya Chelsea’s happiness, try to find the sweet spot of light exposure.
Our lighting tips:
- Place your Hoya Chelsea in a bright filtered light for the best growth and foliage health. East-facing windows tend to make excellent spots.
- If your Hoya Chelsea is a bit dim and gloomy, consider relocating it to a brighter location or using a full-spectrum LED grow light as a sun substitute.
- Avoid putting your Hoya Chelsea in direct sunlight, like the morning or afternoon sun, as it may lead to leaf burn and pesky pests. If your beautiful plant is sunbathing too much, relocate it or use a sheer curtain as a diffuser.
Water
When tending to the hydration needs of Hoya carnosa ‘Chelsea’, also called wax vine, the goal is to avoid over-watering.
Generally, whenever the top layer of soil feels dry, this is prime time for watering. Assess its moisture level by feeling the top 1-2 inches of soil with your finger. Letting it dry between waterings can help keep root rot away.
Be aware when making adjustments based on light exposure that if your plant is receiving more light, it’ll be craving more water than usual!
Temperature and Humidity
Hoya carnosa ‘Chelsea’ prefers a temperature range of 65-80°F (18-27°C). While this hardy plant can adapt to various conditions, it’s crucial to keep it away from cold drafts and direct heat exposure like radiators. Wilting or yellowing leaves at the edges indicate the temperature might be too low or too high — adjust its location accordingly.
With an ideal humidity level of around 50%, the Hoya Chelsea can tolerate the average humidity found in most homes. Shrinking leaves or brown leaf edges suggest low humidity, while excessive humidity can lead to mold, fungal issues, or yellowing leaves.
To raise humidity:
- Place a tray of water and pebbles beneath the plant.
- Set up a humidifier nearby, especially in rooms with air conditioning or heating systems.
- Group your Chelsea wax plant with other plants to share moisture through natural transpiration.
- Regularly wipe down the leaves with a wet cloth, removing dust and increasing its absorption of humidity.
Soil and Planting
This evergreen climber, with its waxy flowers and semi-succulent leaves, thrives in well-draining soil that helps maintain healthy and happy roots.
To create your own soil mix, combine equal parts of regular bagged soil (providing a good base and essential nutrients), perlite (improving aeration and drainage), and orchid bark (adding structure and drainage). This soil mix will ensure that your Hoya Chelsea has the perfect environment to grow.
Repotting
When potting your Hoya Chelsea, start by covering the drainage holes with a piece of window screen, a coffee filter, or a large rock that allows water to pass through.
Repotting your Hoya Chelsea may become necessary after a year or so, as its roots expand and it outgrows its current container. Choose a new pot with drainage holes only a couple of sizes larger than the current pot. This allows room for growth without overwhelming the plant with a new home that has too much space (and soil).
Gently transport your Hoya Chelsea to its new pot, being mindful of the delicate roots. Fill in any gaps with your soil mix, and water the plant thoroughly to help it settle in.
Fertilizer
As your Hoya carnosa Chelsea grows larger, it’ll require more frequent feeding. During the blooming season (spring and summer), use a balanced liquid fertilizer once a month. Be cautious not to over-fertilize, as this can lead to issues like leaf burn and root damage.
Early signs of too much fertilizer include yellowing leaves, wilting, or stunted growth. If you suspect over-fertilization, flush the soil with water to remove excess nutrients and reduce the frequency or strength of your fertilizer (remember, less is sometimes more!).
Propagation
Propagating Hoya Chelsea is super easy, and it has a very high success rate. Both stem and leaf cuttings work well, but we tend to prefer the stem cutting technique, so we’ll walk you through it.
Propagate Hoya Chelsea with stem cuttings:
- Choose a healthy stem: Look for a strand with a few leaves that have a couple of nodes, which are the points where leaves emerge from the flexible stems. Make the cut just below the nodes using your sterilized gardening shears.
- Place the stem cuttings in water first: This step encourages root development. Fill a small container with filtered water and submerge the cut end. Covering the container with a plastic bag or clear container to maintain high humidity is optional but helpful.
- Observe stem cutting development: Refresh the water every few days, and keep it in a bright but shaded area. In a few weeks, you should see new roots growing.
- Create the perfect fresh soil mix: Combine equal parts of soil, perlite, and orchid bark to create a well-draining medium for your new plant.
- Transfer the stem cutting: Gently move the rooted cutting into your prepared soil without harming the delicate new roots. Press the soil around it, ensuring it’s snug and secure.
- Nurture the newly potted plant: Place it in a spot with ample sunlight and maintain the humidity levels. Water sparingly but don’t let the soil get too dry between watering sessions. Avoid fertilizer initially while the beautiful plant establishes itself.
Our propagation tips:
- Always use a clean pair of sharp gardening shears when taking stem cuttings from the mother plant to avoid introducing diseases or pests to your plants.
- Boost the humidity around your cuttings during the rooting process by misting them or using a humidity tray during those few weeks — they’ll thank you!
- For the best results, aim to grow Hoya Chelsea cuttings during early spring or early summer when hoya plants (honey plant) are in active growth mode.
Common Issues
While Hoya carnosa Chelsea is a drought-tolerant plant, it might still encounter a few common issues.
Slow Growing
Hoya Chelsea plants naturally grow at a slower pace compared to other houseplants, and its blooms grow more slowly than other hoya flowers as well. In fact, it’s not unusual for these plants to add only a few green leaves in one growing season. However, if your plant is growing more slowly than expected, it might be due to insufficient lighting or a lack of nutrients.
To tackle this issue, place your Hoya Chelsea in a well-lit area with bright, indirect sunlight and feed it a balanced, water-soluble fertilizer once a month while you see growth.
Leaves Falling Off
Noticing fallen leaves from your Hoya Chelsea? This is likely a sign of overwatering or sudden changes in environmental conditions.
First, check the moisture level of the fresh soil — if it’s constantly damp, reduce the watering frequency and allow the top 1-2 inches of soil to dry out between waterings. Stable environmental conditions, including temperature and humidity levels, are also crucial.
Keep it away from sudden temperature shifts. If a leaf or two has snapped off, don’t fret — the plant is vigorous and can recover from losing a couple of leaves.
Pests and Diseases

Root Rot
Root rot can be a headache for many indoor plant lovers, and Hoya Chelsea is no exception. Overwatering or poor drainage can leave the roots wet and unhappy for too long.
To keep root rot at bay, plant your Hoya Chelsea in a well-draining cactus soil mix or peat-free compost, and only water when the top layer of soil feels dry to the touch.
If your leaves start to yellow or wilt, and the roots may appear slimy or mushy, you can suspect root rot. Don’t panic — simply remove the plant from its pot, trim away any damaged roots, and repot it in fresh soil.
Pests
Although Hoya Chelsea plants are pretty good at standing up to pests, they can still face the usual suspects like mealybugs, aphids, fungus gnats, and spider mites.
Fungus gnats are more likely for Hoya Chelsea plants if the soil stays damp for too long. To tackle this issue, try microwaving the soil mix before planting.
If you’re already dealing with an infestation, let the top few inches of soil dry out between waterings and use yellow sticky traps to catch adult gnats. For more stubborn cases, you can use a soil drench with Bacillus thuringiensis var. israelensis to target the larval stage, or apply neem oil every few weeks.
With spider mites, if you spot tiny white bugs or webbing on your plant, it’s time to act. First, isolate your plant from any others (they’ll appreciate the quarantine). Next, gently wipe the affected areas with a damp cloth.
For more severe infestations, you can use insecticidal soap or neem oil — just follow the instructions on the label. Keep your plant in a humid environment, since mites hate moisture.
Conclusion
That’s a wrap for our Hoya carnosa Chelsea care guide! Hoya Chelsea isn’t just a beautiful plant, it’s also pretty easy to care for, even for a hoya.
Hoya Chelsea care summary:
- Provide bright indirect light, avoiding direct sunlight.
- Maintain a temperature range of 65-80°F (18-27°C) and a humidity level around 50%.
- Use a well-draining soil mixture.
- Water only when the top layer of soil feels dry.
- Feed with a balanced fertilizer monthly during the growing season.
- Propagate with stem cuttings during spring or early summer.
- Watch for common issues such as root rot or pests.
We hope this guide has been helpful! If you have any questions, don’t hesitate to reach out to us. And if you found our guide valuable, feel free to share it with a friend or on social media (or both!).
Happy planting, and take care!
FAQ
Is Hoya Chelsea toxic?
Pet owners will be pleased to know that it is non-toxic. However, it’s always best to keep your plant out of reach for curious pets and children, just to play it safe. While Hoya Chelsea is not poisonous, ingesting any plant material like hoya flowers could potentially lead to gastrointestinal discomfort for your furry friends or little ones.
Which features does Hoya Chelsea get from its hybrid parents, Hoya carnosa and Hoya Krinkle 8?
From Hoya carnosa, the Chelsea inherits its thick, waxy leaves. On the other hand, the Hoya Krinkle 8 passes down its distinctive wrinkled, puckered leaves with sunken veins. Together, these characteristics give Hoya Chelsea a one-of-a-kind appearance that’s both eye-catching and easily recognizable. Its production of star-shaped, fragrant flowers is a delightful trait shared by both parent hoya plants.
Is Hoya Chelsea a semi-succulent?
Yes, Hoya Chelsea can be considered a semi-succulent plant. Its fleshy, thick leaves are an indication that the gorgeous plant is adept at retaining water, a hallmark of succulent plants. Thanks to this characteristic, Hoya Chelsea is relatively low-maintenance and can tolerate occasional neglect.
Keep in mind that while the plant can withstand some drought, it’s essential to provide it with an appropriate watering schedule (don’t just keep the soil moist — let it dry out between waterings).
