
The Peacock Plant is an easy-to-care-for tropical plant that thrives indoors and offers a magnificent surprise in the evenings (where it gets its name as Prayer plant).
In our Peacock plant care guide we’ll go over its ideal conditions, discuss why it’s no longer considered a ‘Calathea peacock plant,’ and cover how to propagate your plant through division. At the end, we’ll discuss the most common issues and what their causes might be.
Let’s go!
Table of Contents
Peacock Plant Care Guide
History, habitat, and characteristics
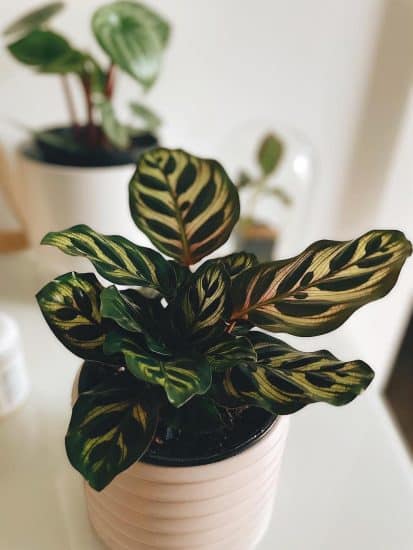
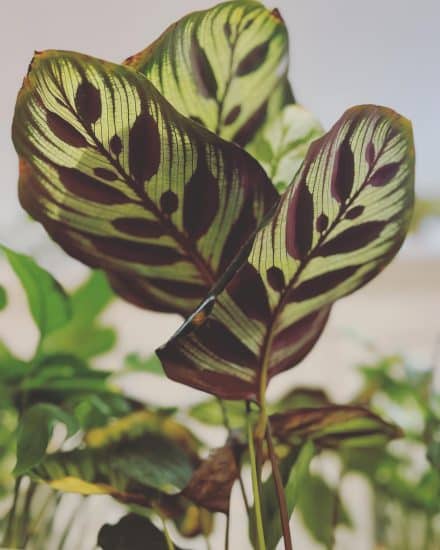
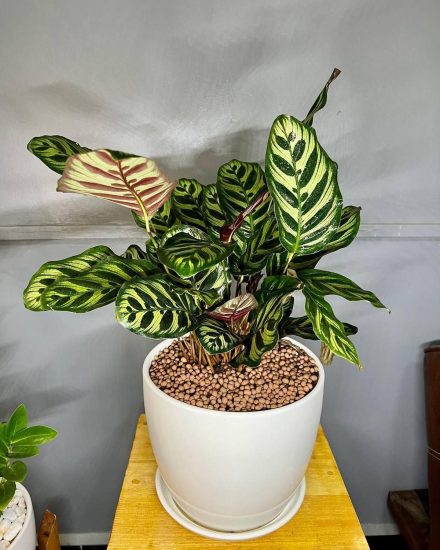
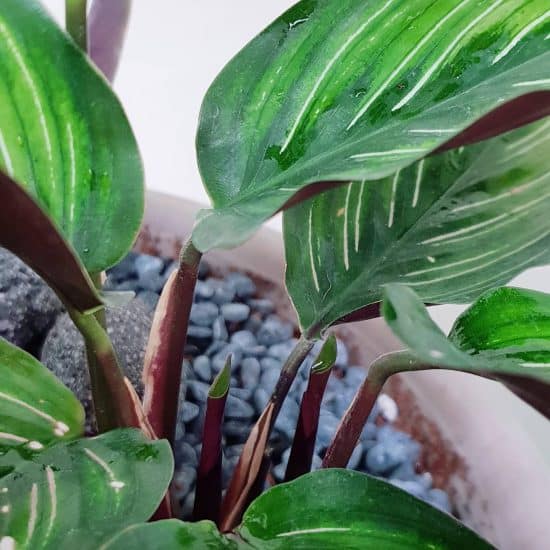
The Peacock Plant (Goeppertia makoyana, reclassified from Calathea makoyana) is an evergreen herbaceous perennial native to the tropical rainforests of South America. Recognizable by its glossy green leaves patterned in cream and pale green on a light background, you can almost hear its feather-like markings calling out its appropriate alias, Peacock plant.
Other than their beautiful leaves, which almost look like they have secondary leaves printed directly on them, a key allure of this species lies in the nyctinastic movements they display.
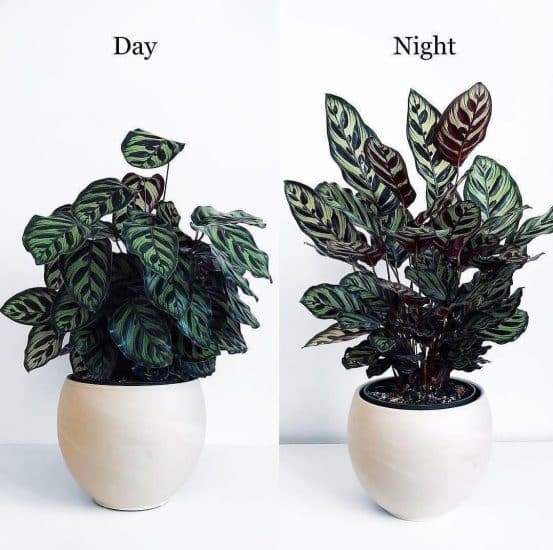
What are these movements? Every night their leaves bend up to the sky, revealing a purple underside and the reason behind their alias of prayer plant.
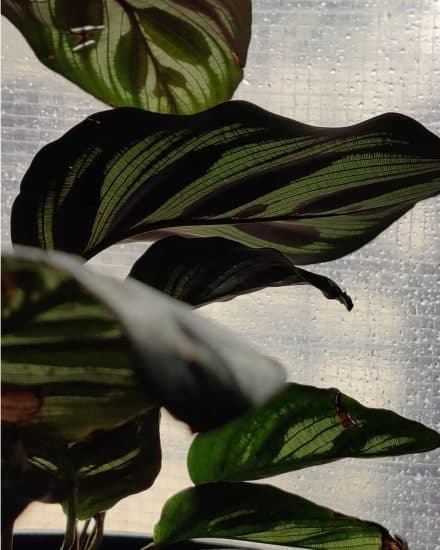
When the sun reflects through the delicate translucent portions of its leaves, it’s often compared to the beauty experienced when viewing cathedral windows. Sensing a naming pattern here?
The two different genus attributions come down to genetic reclassification, as testing revealed that this subgenus has in fact a different ancestor than most Calathea, so the Goeppetria genus was attributed.
Light
Your Peacock plant requires the right balance of bright, indirect light. It needs a minimum of 8 hours of light per day, but should never be placed in direct sunlight.
When it comes to window placement, where should you put it for optimal light exposure?
If you find your plant is not getting enough light, it tells you with small and dull leaves with large spaces between them. This is known as leggy growth. If your Peacock plant is receiving too much light, signs of discoloration and crispy tips on the leaves will start to appear.
So pick a spot with bright, indirect light (ideally near a north or east-facing window) and adjust from there.
Tips:
- Shield it from direct sunlight—this can bleach or burn the leaves.
- Remember, the movement of light through a room changes over the year. Sit with your prayer plant, be mindful of where the direct sun shines, and consider rotating the plant throughout the month.
- Signs of too much light include leaves turning green and becoming denser, with less variegation, as the plant produces chlorophyll to take advantage of its bright location.
Water
An ideal watering frequency is usually once a week, but depending on your particular location and the season, this number can change.
During the hotter summer months, it’s recommended to check the soil every seven days, while during the drier winter months, checking every ten to fourteen days is good practice.
When it comes to determining if the soil is dry, stick a finger an inch or two inside and see how it feels—dry soil means it’s time for a drink.
Use room-temperature water to soak the soil until water trickles out of the drainage holes and pour slowly so that the entire soil is saturated. A bit like a coffee pour-over.
Water your Peacock plant with rainwater, distilled water, or filtered water to avoid impurities in tap water, especially if you notice the edges of your leaves burning.
Watering tips for Peacock plants:
- Avoid allowing Peacock plant to sit in a pool of water, and make sure the soil is completely dry before watering again.
- If the leaves curl or fray, you may need to water them more often. Reduce watering frequency during the winter.
- Make sure the water is lukewarm or room temperature.
- Drainage holes let excess water exit the soil, so make sure they’re properly sized. If you’re still having issues, read on to our soil section.
Temperature and humidity
When it comes to temperature, think warm and toasty. The ideal temperature range for a Peacock plant is between 60 and 75 degrees Fahrenheit (or 15 and 24 Celsius).
To get an exact reading, keep a thermometer close by and monitor the readings over time. Sudden drops in temperature can damage the Peacock plant, so relocate it to a warmer location and you should notice it perk up quickly.
When it comes to humidity, Peacock plants need to hit that sweet spot of 40 to 60%. If you’re having trouble figuring out the local humidity or knowing how much you’re raising it, you can invest in a hygrometer (as opposed to a moisture meter) which measures the ambient humidity in a room.
Tests we’ve done have shown that clustering plants together and using a pebble tray can increase the local humidity by 5-10% without raising it in the entire room. So make sure to place your meter right where you want to measure, as they’re very sensitive to placement.
Humidity and temperature tips:
- Keep your Peacock between 65 – 80°F, away from drafts and vents.
- Set up a pebble tray with rocks and water below the plant pot to naturally increase humidity.
- Group plants together to increase the collective humidity in the environment.
- Consider running a humidifier if things are a bit too dry, like in the winter from running the heat.
Soil and planting
Peacock plants require soil that allows water to pass through easily and yet still holds some moisture. If you don’t have a lot of experience with indoor plants, this will sound complicated and maybe even impossible, but there’s a reason why we recommend the same ingredients for most indoor plants: they work very reliably.
You’ll want to mix together the following for your potting medium:
- Fresh potting soil: Provides a balanced mix of organic material with the nutrients plants need to grow.
- Perlite/vermiculite/LECA: Prevents compaction and provides additional aeration for the root system. Any of these is great.
You’ll want a pot with drainage holes so the water has an opportunity to flow out. Prayer plants only need to be re-potted every two to three years, usually in the spring when your plant is starting to show new growth.
Fertilizer
During the growing season (spring and summer), fertilize your plant with an all-purpose houseplant fertilizer every two weeks. During fall and winter, though, it’s best to take a break from fertilizing to avoid over-fertilization, which can damage the leaves and roots of your Peacock plant.
That’s it for the first part of our Peacock plant care guide. We’ll cover propagation next and then get into the common issues you might experience.
Propagation guide
Calatheas (even if they’re now classified as Goeppertias) prefer propagation through division. You won’t need a lot of supplies, but you will want a mature plant to work with.
Propagating a Peacock plant through division:
Begin by taking your prayer plant out of its container and separating the root clumps. You’ll want each clump to have leaf growth or the propagation won’t be successful. 2-4 leaves are usually sufficient.
- Gently separate the roots from the parent plant with your fingers. (Prayer plant roots are typically hardy, so if you lose a few in the process, don’t worry). If you’re having trouble prying them apart, you can optionally use a sterilized (with alcohol or boiling) knife/shears.
- After you’ve broken apart the separate plants, put each in its own pot, filling them with your potting soil mix.
- Water and care for each divided clump as you would for a new plant.
- Once the clumps have become established, you can divide again, typically in the Spring or Summer.
Common issues
Now let’s go over some of the most common issues you’ll find with Peacock plants. Keep in mind that almost all of these can be fixed pretty easily, and you won’t be the first plant owner to experience them.
The important thing is to use them as feedback on how to take care of your plant and make adjustments as you go along. Soon you’ll just have an intuitive sense for how to adjust the main ingredients of soil, light, water, and humidity.
Brown Tips
Beginning with the basics, if your plant has brown tips on its leaves, then it’s likely telling you it needs more humidity. Maybe a small humidifier in the corner is in order! Additionally, if your leaves are starting to curl, chances are your plant is thirsty, and it’s a sign to give it a much-needed drink.
Yellow Leaves
Yellowing leaves is a good early sign to assess the environment of your plant. If your soil is excessively damp and you notice a foul smell, you may want to investigate the roots and decrease your watering schedule.
Drooping Leaves
When a Peacock Plant’s leaves start to droop, it is likely lacking water. Give your plant a thorough soak, making sure the water is able to drain properly. Take care not to let the plant sit in water, as this could lead to root rot and compromise its health.
If the soil around the Peacock Plant is already damp, the issue may be due to root rot or inadequate drainage. If this is the case, repot your Peacock Plant in fresh soil using a pot with drainage holes.
Nutrient leaching
Nutrient leaching is caused by a combination of high levels of irrigation and slightly acidic soil. In the process of excessive irrigation, soluble minerals, or nutrients, in high concentrations are dissolved from the soil and eventually seep out of the container.
As a result, the plant’s roots can’t absorb enough essential minerals, and the leaves may become yellow or even drop off.
The best way to prevent nutrient leaching is to avoid overwatering. Use the “Finger Method” to check the soil: stick your finger into the soil up to the second knuckle. If it’s dry up to that point, it’s time to water your plant!
It’s also important to make sure you’re using the right soil mixture. Look for a soil blend that contains well-draining elements such as perlite and peat moss, while still retaining moisture.
Diseases and pests
If you’ve taken good care of your prayer plant, it’s unlikely you’ll have too much trouble with any of these. Pests tend to emerge with a weakened plant, and they require immediate attention because many (like spider mites) feed off of the plant’s nutrients, weakening it further in the process.
Fungal Issues
Fungal issues, such as powdery mildew or grey mold, can sometimes occur when the plant is exposed to high humidity and moisture. To check for fungal growth, inspect the leaves for any yellowing, wilting and brown spots. If necessary, repot the peacock plant in fresh soil.
Root Rot
Root rot is almost always caused by overwatering, which causes a lack of oxygen in the plant’s roots. Plants don’t quite drink up their oxygen; instead, they rely on pockets of air known as soil pores.
With dense, flooded, compacted soil, the roots of a plant are weakened and don’t get the oxygen they need. These weakened, wet roots are the perfect breeding ground for diseases and infestations for your plant.
Wilting, yellow leaves and wet soil can be signs of root rot. To avoid this, use a pot with well-sized holes and never let the pot sit in a saucer of water for an extended period of time. If root rot has occurred, cut off any slimy or mushy roots, and repot them into a smaller pot with aerated soil. Make sure to give your soil a chance to dry out between each watering.
Another test is smelling the soil. If it’s a bit funkier than normal, it’s time to inspect the roots of your Prayer plants.
Pests
Common pests to watch for are mealybugs, spider mites, or other insects. Look out for white bugs on the underside of leaves or around the stems. If you spot any, isolate the plant from the others and treat it with soapy water or a neem oil solution. Be sure to follow the manufacturer’s instructions for use, as neem oil must be diluted before application.
Spider mites (and other pests) will sap your plant of nutrients, so handle them quickly.
Scale can be quite hard to spot, as the little buggers attach themselves to the undersides of leaves and form bumps that look like spots. The best way to get rid of them is with neem oil.
Conclusion
That’s it for our Peacock plant care guide!
Tropical houseplants are always a bit of an adventure to care for, but Prayer plants reward our hard efforts as soon as night falls. These plants do well in bright light (indirect), with plenty of moist air, and a stable temperature.
Try your best to recreate the tropical forests they hail from, avoid soggy soil, and you’ll be rewarded with dark green attractive foliage that can feature red hues underneath.
FAQ
Why are Peacock plants also called prayer plants?
It can be a fun surprise, but I’ll spoil it here: take a look some evening and notice how they stretch up to the sky, revealing a colorful underleaf. It’s actually a fair amount of movement, and it can be fun to set up a camera to watch just how much they move!
Do Peacock plants work well an indoor plant?
They do. As long as you keep excess water away (consider adding coconut coir or another material to their soil to provide aeration and drainage) and keep them out of direct light, you’ll have a pretty easy time keeping them happy.
Are Peacock/prayer plants toxic?
They are considered to be non-toxic and safe to keep around the whole family, pets included!
