
Swedish ivy is probably the most lowkey famous houseplant in the entire plant kingdom. Spotted in dozens of pictures of the Oval Office over the years, it comes in many varieties, and looks stunning in hanging baskets.
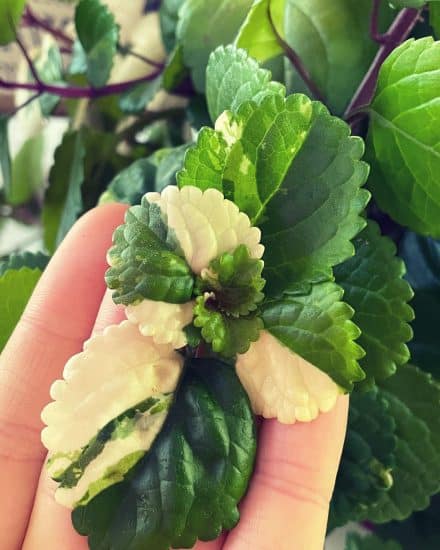
Along with its esteemed governmental position, Swedish ivy’s versatility make it great for those just starting out in gardening—it’s a hardy houseplant that can survive in a range of soil, watering, and light conditions. Bonus: there’s a variegated version with white edges that make a striking contrast.
Ready to learn how this plant got so presidentially preferred and how to grow it for yourself? (It’s easy!) Let’s dig in.
Table of Contents
Swedish Ivy Care Guide
History, habitat, and characteristics

Since President John F. Kennedy received it as a gift in 1961, a glorious Swedish ivy plant has had pride of place above the mantel in the Oval Office of the United States. It’s been there for generations. White House employees, including aides and interns, often get clippings.
A Time article from 1984 gave it high praise: “No other in history has been more photographed, more glimpsed in person by the world’s high and mighty, more privy (if a plant can be privy) to the portentous intimacies of world politics.” Well, okay then!
A plant of contrasts, Swedish ivy, or Plectranthus verticillatus, isn’t actually Swedish, or even technically ivy. Native to southern Africa, it’s now been naturalized in many Central American countries and hotter climes like Puerto Rico and Hawaii, as well as vast swathes of Australia and Papua New Guinea. That’s the Swedish bit. How about the ivy?
Swedish ivy is from the Lamiaceae family, but not the Hedera genus, like actual ivy plants. In fact, it’s related more closely to the oregano and mint plant.
Also, true ivy is thingmotropic (cool word, right?), or grows in a certain direction because it touches something—twines around a pole, for instance, or creeps along a wall. Swedish ivy doesn’t do this.
Okay, now that we’ve gone over what it isn’t, let’s talk about what Swedish ivy actually is.
Plecanthrus verticillatus is a mouthful, from the Greek word “plectron,” meaning “spur,” and “anthos,” which means “flower.” Verticallatus means “whorled” and refers to the flower, or inflorescence. It’s also called Swedish begonia, Creeping Charlie, whorled plectranthus, or, as the Royal Horticulture Society labels it, “misapplied” Plectranthus australis.
Leaves range in shade from dark green to silver and are broadly oval with scalloped edges. Swedish ivy bloom at various times throughout the year with eight-inch white or purple tubular shaped flowers.

Swedish ivy grows quickly on thick stems up to three feet tall, with leaves that grow up to one and a half inches across. Some varieties even boast white markings that create a marbled effect. Speaking of varieties, let’s discuss a few.
Variegated Swedish Ivy

There are many; here are some of the most common.
Vick’s Plant (Plectranthus tomentosus) has leaves that smell like Vick’s VapoRub when you rub them! Its small leaves are fuzzy and dark green with eye-catching flowers ranging from white to purple.
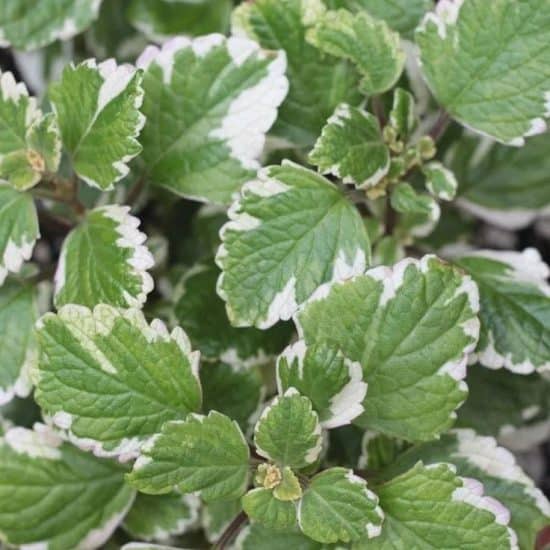
White-Edged Swedish Ivy (Plectranthus coleoides “variegatea”) has beautiful white scalloped edges surrounding rich dark green leaves.
Plectranthus “Mona Lavender” Swedish Ivy (Plectranthus ecklonii) has dark green leaves that grow to be 2 inches, with undersides that are purple. Its flowers are light purple and spike out from the plant.
Emerald Lace Swedish Ivy (Plectranthus oertendahlii) also has green leaves with purple undersides, except these have scalloped edges and are cut through by silver veins. The plant produces small lilac flowers.
Purple Swedish Ivy (Plectranthus Purpuratus) is another variety with purple leaf undersides. This one has green-purplish leaves and shoots out small flowers ranging from bluish-purple, purple, pink, and white on tall stalks.
Light
Swedish Ivy plants can handle a wide range of lighting conditions, but they don’t tolerate low light well. Although this plant can stand some morning sun, indirect bright light is the way to go.
It’s important to monitor the amount of light that your Swedish Ivy is receiving and adjust accordingly. Faded, stunted pale green or yellow leaves indicate that your plant isn’t receiving enough light. If you don’t get enough light, use LED grow lights to supplement.
On the other hand, signs of too much direct light include yellow or brown leaves. Adjust the its distance from a window or light source to ensure it gets the right amount of light for optimal growth.
With the right lighting, your Swedish Ivy will reward you with vibrant, glossy foliage.
Water
When it comes to keeping your Swedish Ivy watered, all you need to do strike a good balance between watering too much and not enough, and it will thrive.
When to water? Checking to see if the top 1-2 inches of soil are damp is a handy, reliable method. If they’re not, it’s time to give your Swedish ivy a well-deserved drink. Following this method, you’ll find yourself watering your plant around every 1-2 weeks in the warmer months, and around every 2-3 weeks in the winter months, depending on local climate.
When using tap water for your Swedish ivy, be mindful that it contains chlorine and fluoride, which can be harmful to the plant in high concentrations. Try to use distilled water or rainwater whenever possible.
Personally, I recommend bottom watering your plant. This means putting it in a bowl of lukewarm water about 1/4th of the way up the plant pot and letting it sit for 10 to 15 minutes, so the roots absorb what they need as they would in nature. This is also better than pouring water directly onto the plant, since it helps protect Swedish Ivy’s delicate leaves and prevent fungal infections.
If you’re in a time crunch or just prefer to top water your plant, you should aim for soil that is just moist, not soggy. If you’re having trouble judging the balance, then try using an indoor watering can that holds a quart of water and measure out the amount you give it.
If your Swedish ivy is overwatered, then you’ll start to notice brown spots on its leaves and stems. Conversely, underwatering is usually indicated by wilted, brittle, and/or yellowed leaves. If you spot this, then increase your watering frequency, but don’t overcompensate—this could lead to root rot. Remember: think moist but not sopping.
Temperature and humidity

Your plant is pretty easygoing in this respect. Swedish ivy grows in USDA Hardiness Zones 10 and 11 and prefers household temps and humidity.
Temperature: Swedish ivy’s ideal temperature range is between 65-75°F (18-24°C). Keep an eye on the temperature around the plant, especially if it’s near draughty windows or vents, as colder temps below 60°F can really stress it out.
Humidity: Average household humidity around 45% is great for this plant. If you find the air in your house is a bit too dry, don’t worry—there are multiple easy fixes:
- Grouping your plants together to share humidity (this is known as transpiration)
- Running a humidifier nearby
- Setting up a pebble tray with water underneath the plant
- Just remember – don’t go overboard with misting or oversaturating the leaves, as this can lead to disease or pests.
It’s best to refrain from misting Swedish ivy, as this can lead to mold growth and root rot.
Soil and planting
Swedish ivy plants prefer a slightly acidic soil pH range of 5.5 to 6.5. As long as your potting soil drains well and doesn’t keep your plant in soggy circumstances, it should be fine. An ideal mix contains:
- 25-30% houseplant soil: Provides necessary nutrients and important soil structure.
- 25-30% perlite and/or pumice: Improves drainage and aeration.
- 20% peat sphagnum moss, 20% coco coir or coco cubes: Encourages adequate drainage and moisture retention.
- 5-10% vermicast: Conditions and provides soil with micronutrients.
You can experiment with the ratio and ingredients to see what your plant likes best. Remember, it’s not an exact science, and learning what your Swedish ivy prefers is half the fun!
Fertilizing
Fertilize your plant with a 10-10-10 balanced liquid houseplant fertilizer once a month at half strength during the spring and summer growing months. During the winter months, don’t use any fertilizer. Swedish Ivy goes dormant at this time, and using it then can actually damage the plant’s roots, causing scorched or wilting leaves.
Pruning
Prune your Swedish ivy regularly to keep it from growing too large and unruly. If it’s starting to get leggy, cut off any longer stems with a sharp, sterilized pair of shears or scissors. These guys can tolerate a lot of pruning, which is part of why they’re good for beginner gardeners.
Repotting
Your Swedish ivy will need repotting after two or three years, or whenever you see roots coming out of the pot’s drainage holes. When you repot it, pick a container that’s about two inches larger than its current one. Be sure to use fresh potting soil to avoid transferring any soil-borne diseases.
Start by loosening the root mass slightly, then gently remove the plant, taking care not to damage the roots. Place the plant in its new pot and fill in the sides with the appropriate soil mix. Press down the soil firmly to ensure good root contact, and water the plant thoroughly.
Okay, you know all about the environmental conditions Swedish ivy needs to thrive, but how do you propagate it for yourself and friends? I won’t keep it a secret—read on!
Propagation guide

Propagating Swedish ivy through stem tip cuttings is a super simple and effective way to increase your plant collection. Try to propagate in the spring and summer months, since the plant will be less stressed during this time.
You can do this through soil or water, but I personally prefer soil, since it’s more reliable and there’s less chance of root rot. If you’re looking for a different, slightly more advanced method, try air layering with sphagnum moss.
To propagate Swedish ivy by stem cuttings:
- Collect a 5-6 inch long stem cutting from your plant. Cut the stem at a 45° angle with sterile (use alcohol) shears or scissors.
- Remove the bottom 2 inches of leaves from the cutting, leaving top leaves intact.
- (Optional: Dip the cut end of the stem in rooting hormone.)
- Insert the cutting into a small vessel filled with the appropriate potting mix, ensuring the cut end is covered and the top two pairs of leaves remain above the soil line.
- Place the plant in an area with bright, indirect sunlight away from drafty windows or radiators.
- Keep the soil moist and wait 2-3 weeks for the roots to begin growing. If the planter is clear, you may be able to see the new root system developing. Otherwise, you can gently tug on the cutting’s base to feel if it has rooted.
A few notes on propagation:
- We use an angled cut on the stem to increase the surface area of the cut to encourage more root growth. If you’re propagating by water, this can also keep the stem from sitting flush with the bottom of your container.
- You’ll also want to only cover two inches of the stem with soil and place it in an area with 4-6 hours of bright, indirect sunlight daily.
You’ve successfully propagated Swedish ivy! Now let’s delve into how to keep it thriving through any potential problems that may come up.
Common issues
To keep your Swedish ivy’s leaves healthy and vining stems strong, keep a look out for these common issues so you can remedy them as soon as they start.
Brown leaves: If the plant’s leaves are browning, it might be getting too much sun. Swedish ivy prefers temperatures below 80 degrees Fahrenheit, especially during the peak hours of direct sunlight. To promote cooler temperatures with increased humidity, consider adding a layer of mulch around the base of the plant. Additionally, if the plant is kept in a container, move it out of direct sunlight and to an area with indirect lighting.
Yellowing and Drooping Leaves: If leaves become yellow and droopy, this could be the result of either over or underwatering (or an iron deficiency, which I cover later). To determine the cause, inspect the soil by touching it gently. If it’s dry, the plant needs more water; if it’s wet, the plant is likely being overwatered.
Spider Mites: Spider mites are one of the most common issues Swedish Ivy encounters, as they are drawn to the plants’ juicy leaves. Symptoms to look out for include yellowing or discolored spots on the foliage and fine webs draped from the foliage. To get rid of spider mites, take the plant outside and spray it with a hose to remove them. Then, douse the plant with an insecticidal soap solution and dispose of any heavily infested leaves.
Legginess: Overly leggy Swedish ivy can be a result of too little light. To encourage fuller growth, regularly trim excess foliage, especially along the vines. This will help to keep the vines compact while also promoting new growth and bushier plants with more vibrant foliage.
Diseases and pests
Like most plants, Swedish ivy can suffer from root rot. While it’s usually impervious to bugs, this plant can still get the occasional pest. Don’t worry, though —dealing with this stuff isn’t difficult at all.
Root Rot. Root rot is a common issue that can affect Swedish ivy and is caused by overwatering the soil. Signs of root rot include the stems feeling soft and mushy, wilting, and the presence of rotten roots.
Solution: If you catch it early, you can still save the plant! Cut off any rotten parts and use fresh potting soil when you repot it. Make sure to check the soil before watering so you can prevent root rot from happening again.
Pests. Swedish ivy is usually pest-resistant, but mealybugs and spider mites can still be a problem. Mealybugs look like puffs of cotton on your leaves, sometimes hiding underneath.
Solution: First things first: isolate the affected plant from all the others so the pests don’t spread. I recommend first physically removing them with a spray of water or a Q-top dipped in alcohol. Then apply insecticidal soap (you can buy this over the counter) or neem oil.
Conclusion
Popular as a houseplant, Swedish ivy is beloved for its versatility and hardiness, and how easy it is to propagate. It produces delicate trailing leaves that look elegant in a hanging basket and are hard to kill, which is a major bonus for many people I know.
(Not you, of course.)
Keep your Swedish ivy in indirect bright light at household temperature and humidity levels in loamy, well-draining soil, and propagate it by stem tip cuttings for everyone who needs a little bit of greenery in their space. You’ll be giving out president plant twins in no time!
If you found this article useful, feel free to share it with a friend, and get in touch with us over Facebook or Twitter with any plant-related questions or feedback!
FAQ
Does Swedish ivy clean the air?
According to the Alaska Master Gardener Community at the University of Alaska, Swedish ivy is a top choice for cleaning ozone-forming (O3) chemicals from the air.
Is Swedish ivy toxic to humans?
Nope! According to the ASPCA, this is a safe plant for both humans and pets.
Is Swedish ivy fast-growing?
This plant grows quickly, up to 2 or 3 feet tall with a 3-foot spread.
Does Swedish ivy come back every year?
Indoors, Swedish ivy only goes dormant during the winter. Outdoors in warmer climates, if it isn’t exposed to temperatures below 50 degrees, it should be fine. If it freezes, however, there is a chance it won’t come back the next growing season.
Does Swedish ivy like being misted?
Misting it every so often can help root out potential pests, but it isn’t effective to increase humidity over the long-term. Be sure to mist this plant sparingly in order to avoid oversaturating its leaves, which can lead to rot issues.
Sources
- https://denverite.com/2020/04/16/houseplant-of-the-week-the-worlds-most-powerful-plant/
- https://www.rhs.org.uk/plants/13263/plectranthus-verticillatus/details
- https://www.missouribotanicalgarden.org/PlantFinder/PlantFinderDetails.aspx?kempercode=b648
- https://www.aspca.org/pet-care/animal-poison-control/toxic-and-non-toxic-plants/swedish-ivy
- https://alaskamastergardener.community.uaf.edu/2015/06/24/indoor-air-quality-and-plants-a-clear-as-smoke/
